(3/3/15 EDIT – it turns out that installing OSM is simpler than I thought. I’ve published an update to this post which details the steps taken to a successful installation)
Over the past few weeks I’ve spent a lot of time wrestling with installing an OpenStreetMap server. In theory this should be simple. The tutorial for the version of Ubuntu that I use makes it look easy. Instead this is the most difficult install I worked with since the days when Oracle released their shrinkwrap products with incorrect documentation.
The OSM install involves five different products, some of which need to be compiled from source, and one which doesn’t work in the documented version. Fortunately, a lot of the problems I faced could be resolved via Google. Although using make only increases my love for maven. I don’t miss old-school build systems.
I’ve had multiple stabs at installing OSM, which seems about par for the course. I’ve not succeeded yet, but I seem to be making progress. I thought I would document what I’ve done here – partly for my own benefit and partly for anyone who comes by on Google and is as lost as I am. I’m determined to succeed at this – it’s a challenge and a puzzle and will probably seem quite simple once I’ve cracked it.
The Stack
The OpenStreetMap stack consists of four elements:
- mod_tile, an apache module that serves and caches map tiles
- renderd – a “priority queueing system” to manage the load from mod_tile’s rendering requests.
- mapnik – the software library that does the actual rendering of the map tiles.
-
postgresql/postgis – the datastore containing the mapping elements
OSM also needs osm2pgsql to load the OSM data into postgis. So far, I have mapnik working and mod_tile passing requests to renderd, but I cannot link renderd to mapnik. The only thing I’ve served from mod_tile is this world map, which is produced outside the main mapnik process:

Installation
The OSM installation is fiddly, which means Googling for the issues. There are also lots of fileswhere a small mistake can need debugging, for example replacing variables in DTD entities. Things like these would be easier if the installation files were opinionated – this works well in Spring Boot and Maven.
The main issue I’ve had is with versions of software (which is where I think I’m currently stuck). One bug had to be fixed by using a version of mod_tile from github.com:springmeyer/mod_tile.git. However, I am not convinced this is playing nicely with some versions of mapnik.
I had decided to use a limited area of the world, rather than the full-on 29GB download. To work out what tile co-ordinates are needed by mod_tile requires a mapping from long/lat to the OSM cordinates (I used the python scripts on that page). These co-ordinates can be checked against the OSM public servers. For example, Brighton is http://a.tile.openstreetmap.org/12/2046/1374.png.
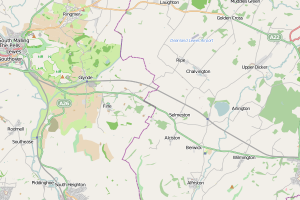
As I said above, I still can’t get renderd to talk to mapnik, although mapnik is working, shown by this attempt to render Brighton:

Apparently, the East Sussex data I had didn’t include Brighton. But a query in East Sussex produced a decent map:
What Next?
Despite my issues, I’m still excited about OSM and have a couple of ideas for using it. And I’m convinced that I can figure out what’s going wrong, although I will need to sit down and actually read the mod_tile documentation rather than trusting to installation guides and online discussions.
I regret not attempting the original installation on a Vagrant VM, as this would have enabled me to start from scratch. I may have to do a little work to remove the different versions of libraries on my laptop before I can continue the installation.
Hopefully, another few hour’s work should see me with a working version of OSM. Once I’ve done that, I will write up a step-by-step list of the steps required.