Amazon’s Alexa is a virtual assistant available on the Amazon Echo, as well as (with a little struggle) on the Raspberry Pi. I find voice interfaces fascinating – they’re a staple of sci-fi, and the natural way people communicate with one another. Email and IM are great, but look at how often people switch from these to picking up the phone for a discussion. Voice works.
One of the great things about Alexa is how easy it is to build a skill (as new Alexa abilities are called). There’s an Amazon tutorial that explains how to get a skill up and running in five minutes. There are also lots of useful blog posts on the subject, of which this is another. It will be the first in a series of posts. This initial version simply returns a randomised String to demonstrate how easy it is to get Alexa to work.
All the code here is in a git repository. I’m going to draw attention to specific parts of the code, but not repeat the entire contents of the repo.
Pre-requisites
Working through this tutorial requires a basic Java development environment (with gradle and git) and an Amazon account with AWS and Amazon Developer access.
The Basic Application
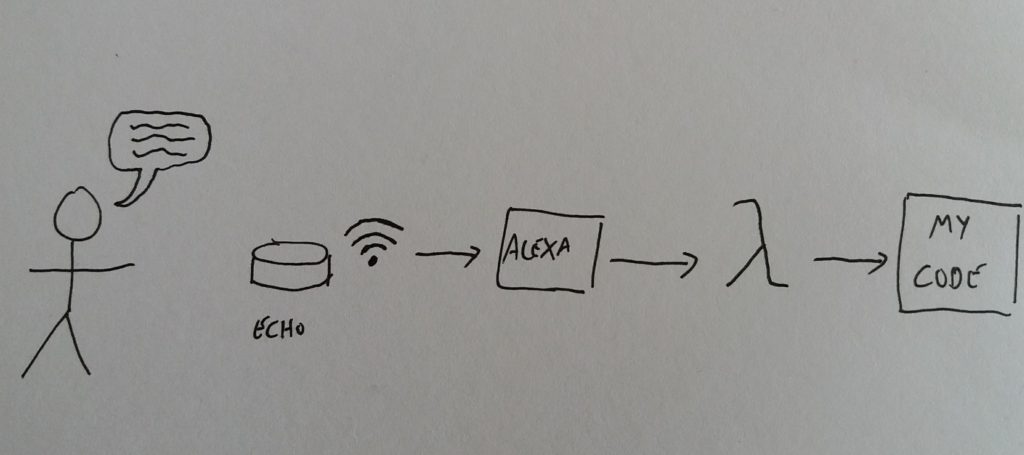
At their simplest level, Alexa skills receive a String and return a String. Amazon handles the parsing of the voice, and even does some neat things to contextualise what it has heard – for example, adding metadata about dates and times in the request. The skill simply needs to use this input to generate a response (sometimes marked up with Speech Synthesis Markup Language metadata).
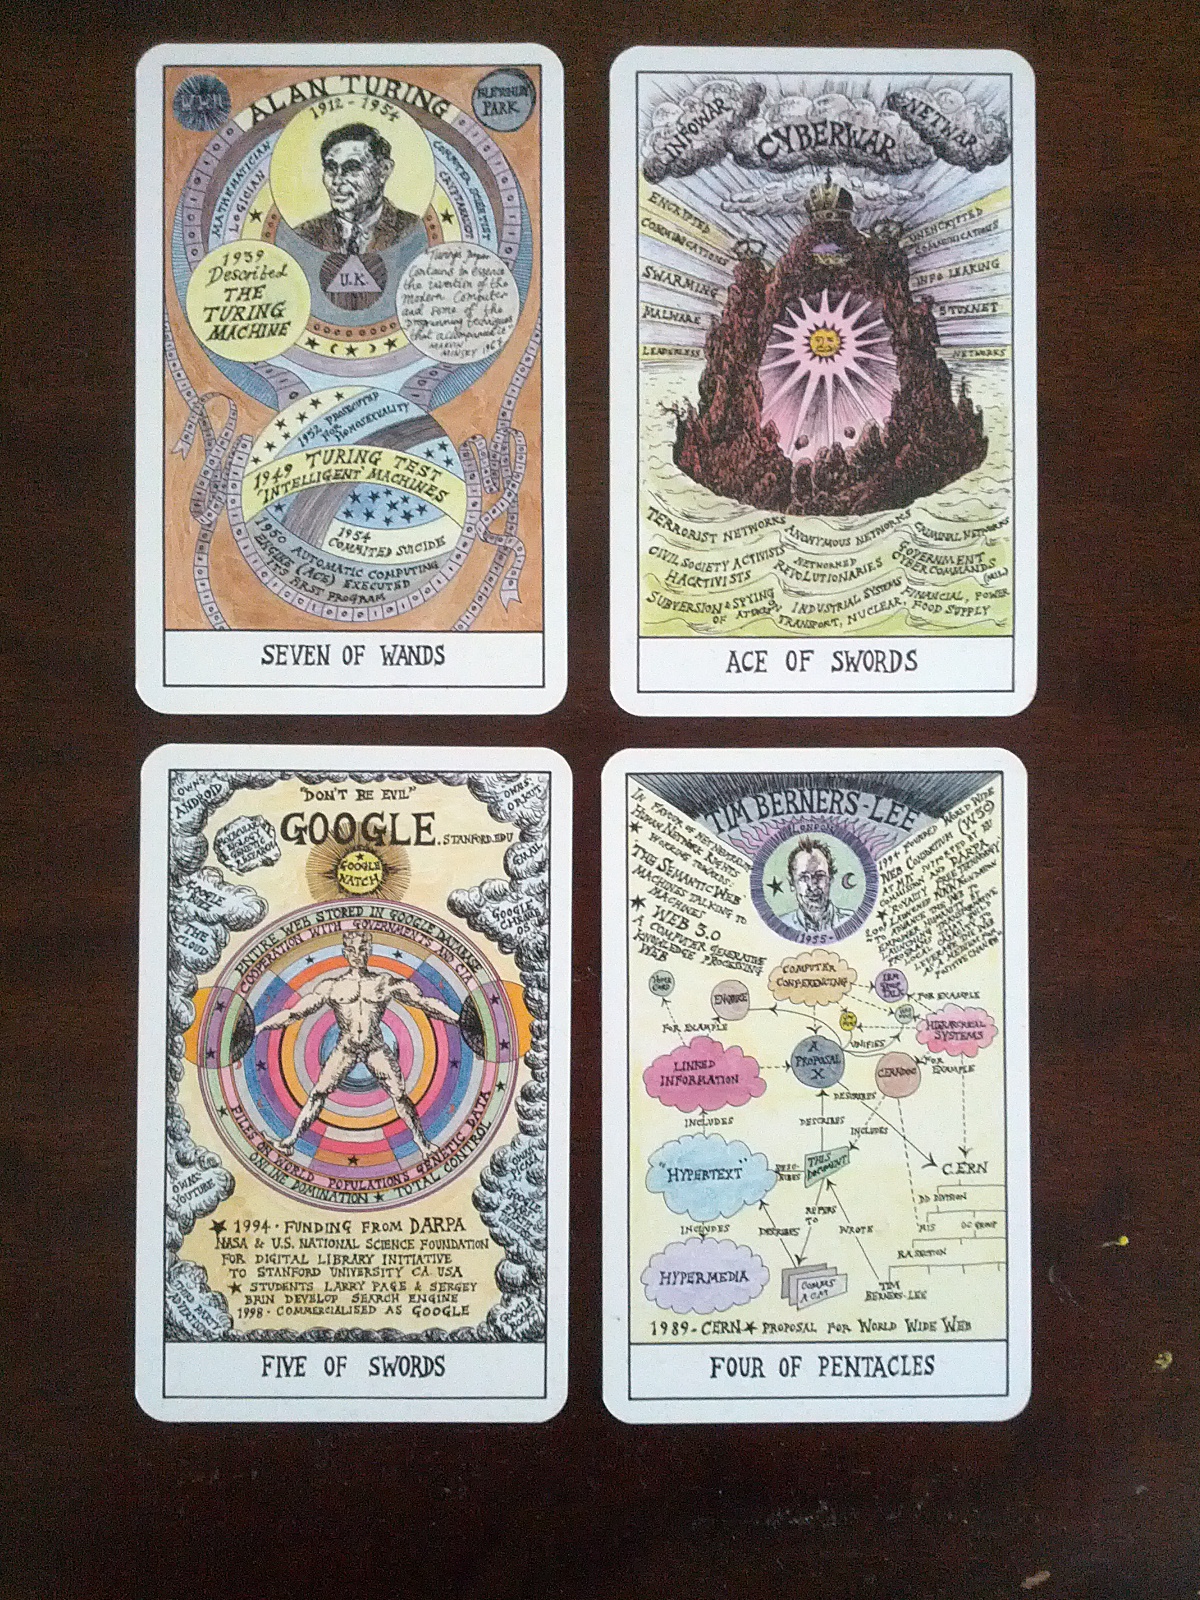
The application I’m working on is a simple Tarot card reader. I became interested in tarot through the Hexen deck, which I saw at the V&A’s recent You Say You Want a Revolution exhibition. The cards are based on the history of the Internet and counter-culture:

I don’t believe in the tarot as a fortune-telling method, but I’m interested in it as, in Italo Calvino’s phrase, “a machine for telling stories”. And I like the idea of having a piece of technology like Alexa reading and interpreting the cards. I mean, that’s science fiction, right?
Building the Basic Code
The first tag in the repository is for a simple Java class returning a string. There is no Alexa code at this point – when this is added in the next step, it is simply as an interface for this simple code. We could as easily hook up the basic class to a twitter bot, or a web-server, or even an email auto-responder. The core code does not depend upon Alexa. To have a look at the basic code, clone the repository and then checkout the initial commit:
git clone git@github.com:orbific/alexa-tarot-skill.git
cd alexa-tarot-skill
git checkout basic-tarot-class
The first version of the TarotCardPicker creates a deck of 78 cards, then selects a random one. At this points we’re ignoring things like reversed cards and interpretations in favour of simplicity. We’re also ignoring lots of things like internationalisation, unit tests and javadoc which would be expected if this were to be used as production code.
It’s possible to compile and run this piece of code.
gradle build
java -jar build/libs/alexa-tarot-skill-1.0.jar
Running the two commands above from the project’s root directory results in a line of text stating the name of the card that has been picked. The next stage is to make this code available via Alexa.

Adding the Alexa/Lambda files
The easiest way to get going with a skill is to use Amazon Web Services (AWS) to host the code. The specific part of AWS that is used for Alexa is AWS Lambda. This is a serverless code environment and basically means a piece of code can run without having to worry about infrastructure. You don’t need to use Lambda, but it makes life a lot easier – running Alexa skills from web services means having to deal with certificates between Alexa and another environment.
To see the basic framework code, use the appropriate checkout:
git checkout basic-alexa-framework
There are five files needed to wrap Alexa around the simple Tarot code:
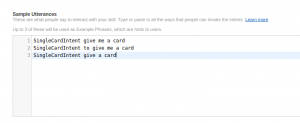
- SampleUtterances.txt – the next file lists all the different ways a user might contact the service. These are grouped into ‘intents’. If you wanted to ask for a coffee you might say “Please give me a coffee”, “I’d like a coffee” or “I demand coffee”, all of which have the same Intent. This file maps statements to intents.
- IntentSchema.json this describes the intents the skill expects to receive. We can also use in-built intents, which allow different apps to have similar functionality. For example, I might ask Alexa to tell me how the Tarot card functionality behaves, which would trigger a HELP intent.
- TarotSpeechletRequestStreamHandler.java this class is a subclass of SpeechletRequestStreamHandler. The documentation explains “This class provides the handler required when hosting the service as an AWS Lambda function” – it’s a link between AWS lambda and Alexa. It’s pretty much a piece of boilerplate code.
- TarotSpeechlet.java the Speechlet is a simple interface that defines the Alexa behaviour: this implements the SpeechletV2 interface which is the main provider of the Alexa behaviours. In this case, it receives an intent and provides a response.
- log.properties this file defines the logging for the lambda function.
Code structure

As stated above, there are two Java classes. As the link between Alexa and the application code, TarotSpeechletRequestStreamHandler is fairly straightforward. It contains a static initializer which copies the APP_ID environment variable to a supportedApplicationIds variable, which can then be passed through the constructor to the superclass.
public class TarotSpeechletRequestStreamHandler extends SpeechletRequestStreamHandler {

private static final Set<String> supportedApplicationIds = new HashSet<String>();

static {
String appId = System.getenv("APP_ID");
supportedApplicationIds.add(appId);
}

public TarotSpeechletRequestStreamHandler() {
super(new TarotSpeechlet(), supportedApplicationIds);
}
}
Obviously, it would be possible to have the APP_ID hardcoded here, but this saves a little messing around. The reason for checking the application ID is to ensure that the request has come from our Alexa skill. It would be possible for someone who knew our endpoints to try sending requests, using our code to do the hard work for them (and be billed for it). Every request for Alexa includes an application ID, that can then be checked.
The Alexa code, the interesting bit, is contained within the TarotSpeechlet. This particular class is extremely simple, but it demonstrates the basic behaviour of Alexa. There are four overridden methods from the interface which are described in the javadoc:
- onLaunch is “Entry point for Speechlets for handling a speech initiated request to start the skill without providing an Intent”. We’re ignoring this functionality.
- onSessionStarted, onSessionEnded are two callbacks for when a session begins or ends. Sessions are outside the scope of this particular post, but I’ll write about them later. This allows the creation of skills that include a series of interactions.
- onIntent is called when a speech request linked to an intent is sent. Here we check for a single intent and if that is not found then an appropriate response is made.
The onIntent method is relatively simple:
@Override
public SpeechletResponse onIntent(SpeechletRequestEnvelope<IntentRequest> requestEnvelope) {
  Intent intent = requestEnvelope.getRequest().getIntent();
  String intentName = (intent != null) ? intent.getName() : null;
  if ("SingleCardIntent".equals(intentName)) {
    return getSingleCardResponse();
  } else {
    return getUnknownCommandResponse();
  }
}
Note that the response is created as a SimpleCard – this is used in the Alexa app to add contextual information to the speech. I’ve also stripped all of the logging to make it simpler.
Putting the application live
At this point, we have all the code that we need to put this application live. There is still a little bit of work required to get the new skill connected to Alexa. I’m not going to outline all of the steps in detail, but will list the basic steps as at the time of writing (late June 2017). I’m also going to assume that an AWS account is available. AWS Lambda is available on the free tier.
The first step is to produce a ‘fat jar’ locally. This is jar file that contains all of the projects dependencies. The build.gradle file contains a jar target that builds this far jar.
gradle build
The resulting file, ./build/libs/alexa-tarot-skill-fat-1.0.jar, is 9.4MB.
The basic steps for the upload are described on Amazon’s page, Deploying a Sample Custom Skill to AWS Lambda. There are three stages to this process:
Creating the Lambda function
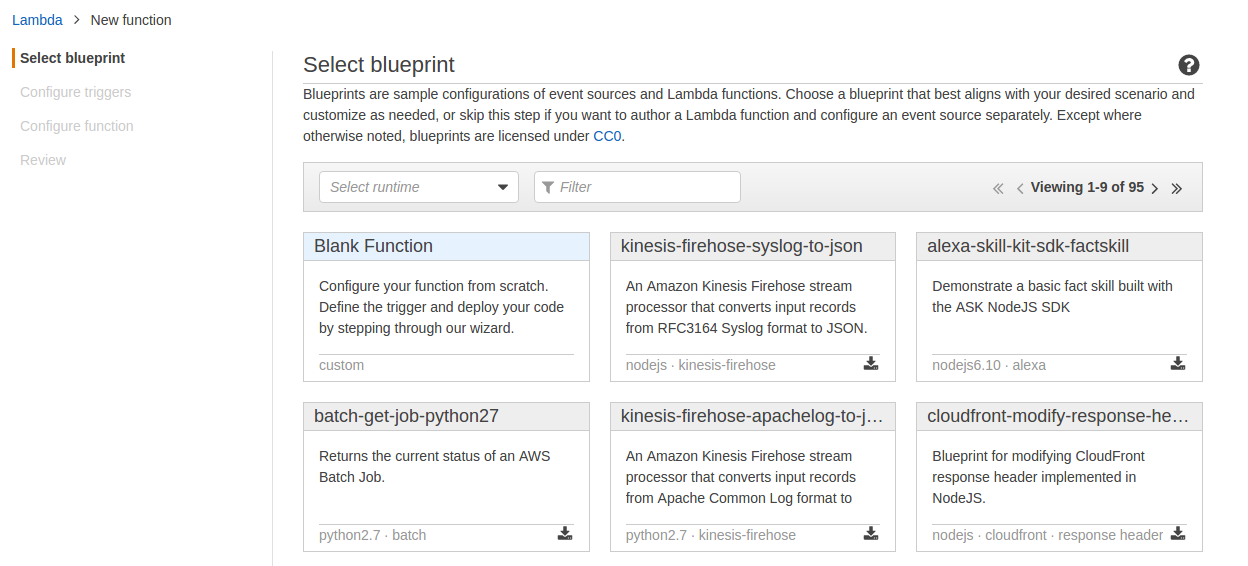
Log into AWS lambda, and create a new lambda function. Currently, this needs to be in one of two specific regions, US East or EU. The first option is to select a blueprint. Use a blank function.
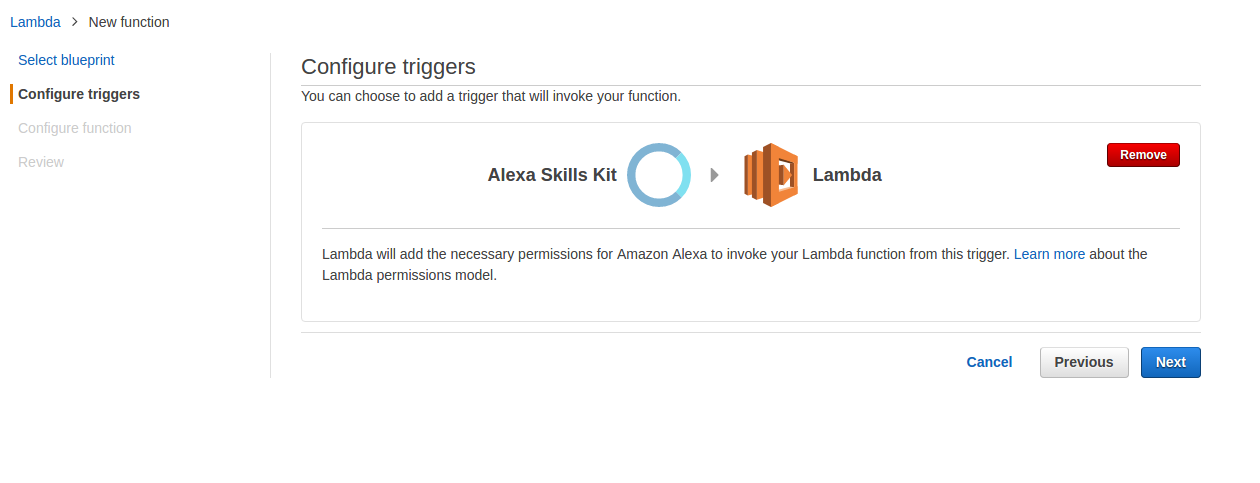
The second stage is to create the appropriate trigger. From the list available, select “Alexa Skills Kit”. To generate the list, click on the dotted-rectangle to the left of the Lambda logo.

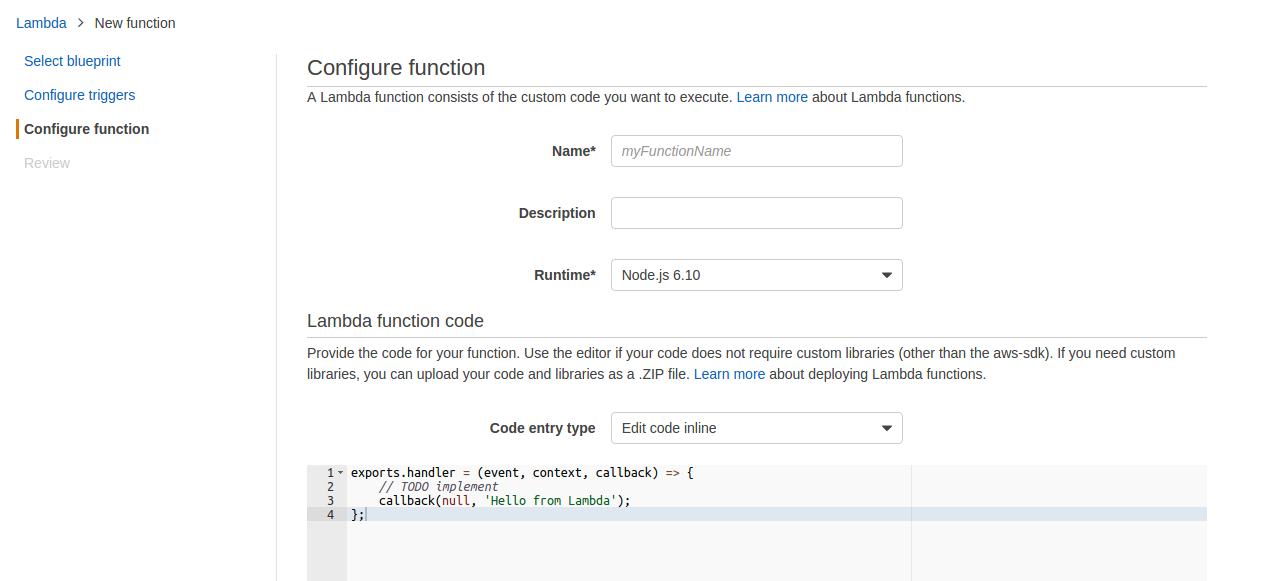
The bulk of the configuration is contained in the next screen, Configure function.
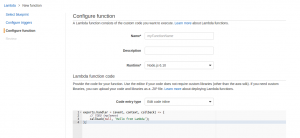
The required options are as follows:
- Name and description are set as needed
- The runtime drop down is changed to ‘Java 8’, which updates the options below in the form.
- The Upload button is used to upload the far jar from earlier to AWS
- No environment variables are set at this point. We do not have the APP_ID that will be provided by Alexa, so the skill will not work properly yet.
- The handler is the packaged classname for the SpeechletRequestStreamHandler. In this case, it will be com.riddlefox.tarot.TarotSpeechletRequestStreamHandler
- The role needs to be set. If there is no existing role for the account, the drop-down opens a new page in the browser to set up a new role.
- The Tags and Advanced Settings can be ignored.
Pressing next results in a summary page, and the Create Function button can be pressed to complete the work. This takes a little time to work. Once it is complete, look at the settings for the function to find the ARN. This will be needed in the next stage.
Linking Alexa to the Lambda function
The next task is to create an Alexa skill that connects to the newly-created Lambda function. This requires an account on the Alexa developer portal. Log in to this and select the Alexa Skills Kit option. This has a button, Add a new skill. Press this to begin the process. The resulting form looks quite complicated, but not all of the tabs need to be filled in.
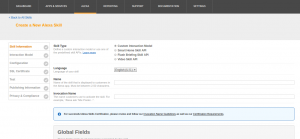
Skill Information
- If necessary, change the language from English (US) to English (UK) as this can improve the information received from Alexa.
- The name should be filled in as needed
- Invocation name is the name that needs to be spoken to contact the skill.
- Press Save
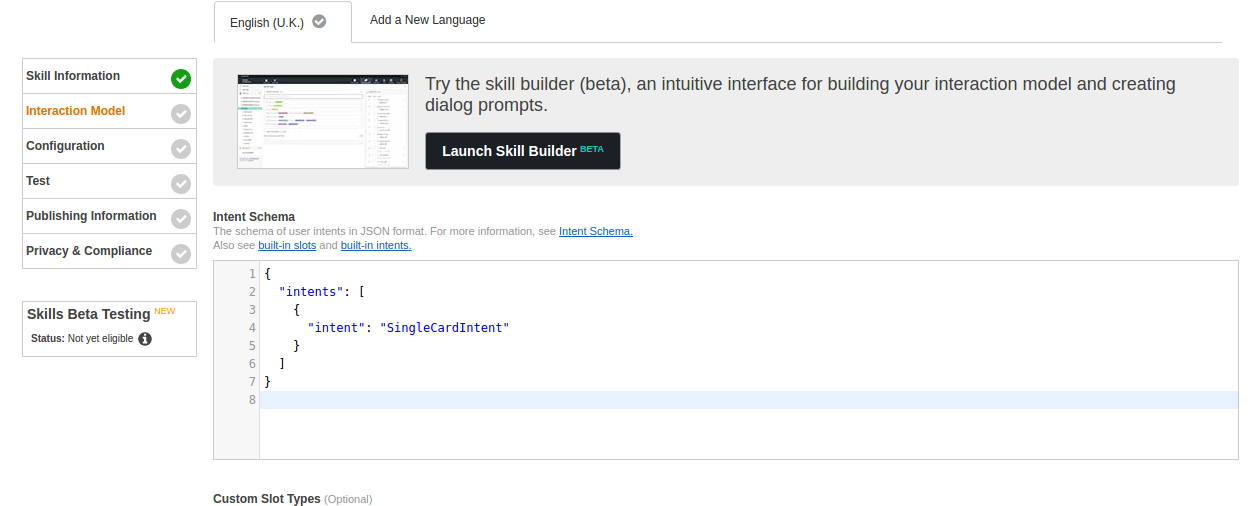
Interaction Model
This section defines the way in which Alexa interacts with the Lambda skill. It requires us to copy the information from the resource files. The intent schema requires the content of the IntentSchema.json file:
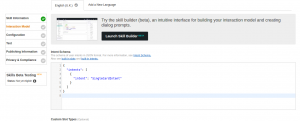
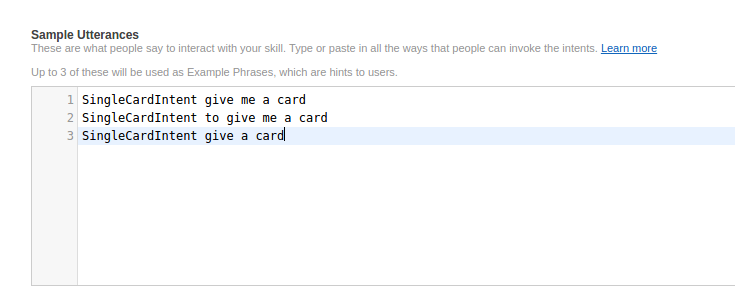
Further down the page we need to provide our sample utterances. These are in the SampleUtterances.txt file:
Press the save button to make sure everything is as expected, then press next.
Configuration
This tab defines the link to AWS Lambda. Set the service endpoint type to be AWS, pick the region and add the ARN in the (untitled) text box:
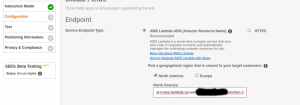
Press save and next.
At this point, the application ID will be available. This is a long string that begins “amzn1.ask.skill”. This now needs to be copied across to the environment variables for the lambda function.
Adding the app ID to the lambda function
Returning to AWS lambda, open the configuration for the function that has been created. Add a new environment variable, called APP_ID, which contains the application ID from earlier. Save this, and the Alexa skill has been set up.
Demonstrating the Skill
Having set up the skill, how do we confirm that it works? Go back to the Alexa developer page and open the Skill in question. On the Test tab, there is a ‘Service Simulator’ section. Entering an utterance here and pressing the Ask Tarot Demo button lets us see the request and response:
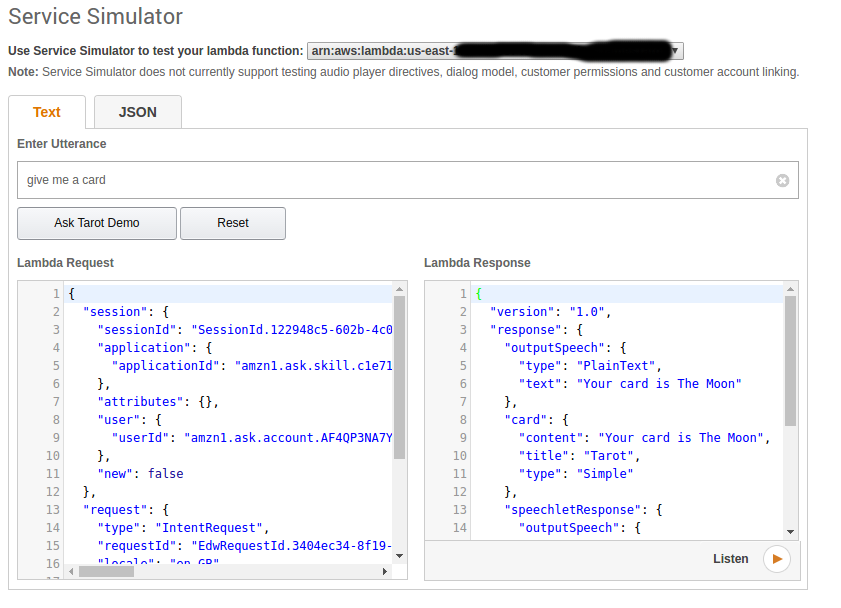
The final stage is to test it on the Alexa device. Because this skill is still at the developer stage, it can only be tested on Alexa devices connected to the developer account. Saying “Alexa, ask Tarot, give me a card” will result in Alexa saying the name of a card.
If you do not have a physical Alexa-enabled device, it is also possible to test Alexa through a web browser at
echosim.io. Note that this still requires a valid Amazon account.
This post has shown how to set up a very simple application in Alexa. There’s not much more to it, other than demonstrating the set-up, but future posts will focus on how to get Alexa to do more interesting things.
If you have any questions, or anything is not clear, then please leave a comment and I will update the text.