Categories
continuousdelivery

Spring Bootstrap (and AngularJS!)

Over the past few weeks I’ve been working on my simple Java application, which I’m planning to put into a github archive as the basis for Java prototyping. The last thing needed  before doing this is to tidy up the front end.

I’m not a particularly experienced front-end developer – it’s a skill I’ve neglected over the years. But it’s hard to excuse not making some effort. A lot of people find it easier to appreciate a prototype when it looks a little polished.

In this post I’m going to summarise basic steps to add Bootstrap and AngularJS to a project (it’s not intended as a step-by-step tutorial!). Adding Angular is particularly useful as it allows the back-end to be sensibly separated from the front end. I’ve worked at too many places where a templated front-end became tightly coupled to the back-end. A REST server accessed via a Javascript framework like Angular is much more sensible. It forces the back-end to remain independent, with a clear, well-communicated API.

REST endpoints

Converting a Spring endpoint to use REST is ridiculously easy. I had a simple Spring Data repository that returned a list of RSS entries. The controller class was annotated with the @RestController annotation. Then there was a method returning a list of Entry objects:

@RequestMapping("/rest")
@CrossOrigin
public List<Entry> rest() {
  List<Entry> entries = new ArrayList<Entry>();
    if(entryRepository!=null) {
      entries = entryRepository.findAll();
    }
  return entries;
}

The CrossOrigin annotation was there to allow me to access the endpoint from a local copy of the HTML page. This meant I could test changes to the static content without redeploying the Spring application.

Bootstrap

Bootstrap is a front-end framework, designed to make it easier to produce decent looking UIs. Even at its most basic level, it avoids an HTML page looking like the dreary browser defaults. All that is needed it to adapt one of the basic templates.

AngularJS

I’m less confident about my AngularJS use than any other part of this project. It works, but I can’t guarantee that I’m using Angular in the most sensible or efficient way.

There are two files involved, a Javascript page and some changes to the HTML page. The relevant section of the HTML page is straightforward:

 <div ng-controller="Rss">
 <table>
 <tr>
 <th>Title</th>
 <th>Link</th>
 </tr>
 <tr ng-repeat="entry in entries">
 <td>Title: {{entry.title}}</td>
 <td>{{entry.link}}</td>
 </tr>
 </table>
 </div>

The Javascript file contains the following method:

function Rss($scope, $http) {
  $http.get('http://localhost:8080/rest').
  success(function(data) {
  $scope.entries = data;
 });
}

Conclusion

While the front-end described here is not sophisticated, it improves signficantly upon the default UI provided by a browser. It also separates the UI clearly from a REST API for the backend, allowing the two to be worked on independently.

Categories
continuousdelivery

A quick note on Spring Integration

Another thing I’ve played with recently is Spring Integration, adding an RSS reader to the example I’m working with. There are a lot of examples of Spring Integration about the place, but there weren’t any doing exactly what I wanted – the clearest examples tended to rely on XML rather than annotations.

(An interesting discussion on a recent Java Council podcast discussed how common it was to find obsolete answers voted up on Stack Overflow. It’s easy to find answers to technical questions these days, but sometimes it’s harder to find the most up-to-date answer).

Anyway, I put together a working, if clunky, RSS reader, and thought I would make a quick summary of the changes it required.

build.gradle

Some new dependencies were needed in build.gradle:

 compile("org.springframework.boot:spring-boot-starter-integration")
compile("org.springframework.integration:spring-integration-feed")
 compile 'com.rometools:rome:1.6.0'

resources/feed-bean.xml

For the sake of expediency, I succumbed to a little XML. With a little more time, I could transalte this into the newer annotation format:

<?xml version="1.0" encoding="UTF-8"?>
<beans xmlns="http://www.springframework.org/schema/beans"
 xmlns:xsi="http://www.w3.org/2001/XMLSchema-instance" xmlns:int="http://www.springframework.org/schema/integration"
 xmlns:feed="http://www.springframework.org/schema/integration/feed"
 xsi:schemaLocation="http://www.springframework.org/schema/beans
http://www.springframework.org/schema/beans/spring-beans-3.0.xsd
http://www.springframework.org/schema/integration
http://www.springframework.org/schema/integration/spring-integration.xsd
http://www.springframework.org/schema/integration/feed
http://www.springframework.org/schema/integration/feed/spring-integration-feed.xsd">
 
 <int:channel id="feedChannel">
 <int:queue />
 </int:channel>
 
 <feed:inbound-channel-adapter id="feedAdapter"
 channel="feedChannel" url="http://feeds.bbci.co.uk/news/rss.xml?edition=uk">
 <int:poller fixed-rate="30000" max-messages-per-poll="100" />
 </feed:inbound-channel-adapter>
 
</beans>

Controller Java class

I added a new method to my existing controller (which is turning into a little of a catch-all class – I’ll be a little more tidy when I come to do this as part of my Java infrastructure write-up)

@PostConstruct
public void setUpRssReader() {
  ApplicationContext context = new ClassPathXmlApplicationContext( "/feed-bean.xml");
 
  // create a pollable channel
  PollableChannel feedChannel = context.getBean("feedChannel", PollableChannel.class);
 
  for (int i = 0; i < 10; i++) {
  // receive the message feed
     Message<SyndEntry> message = (Message<SyndEntry>) feedChannel.receive(1000);
     if (message != null) {
       SyndEntry entry = message.getPayload();
       log.info(entry.getPublishedDate() + " - " + entry.getTitle());
       Entry myEntry = new Entry(entry.getTitle(), entry.getLink());
       entryRepository.save(myEntry);
     } else {
       try {
         Thread.sleep(10000);
       } catch (Throwable t) {
         // ignore
     }
   }
  }
 }

It’s not a particularly sophisticated example, but it illustrates how easy it is to set up simple integrations in Spring. I’m now going to proceed to set up a decent front end – once that is done, I can put it all together to make a very simple Java prototype.

Categories
continuousdelivery

Databases and continuous deployment

Flyway

After my recent experiment I’m going to add in databases. One of the pain points in most deployments I’ve worked with is the need for database updates. These were always manually applied and, in some cases, required a time-consuming reversion if things went wrong. And, of course, the production database would never be quite in the state expected.

There are options for automatic deployment including Flyway and Liquibase. These maintain a database version number and apply any new scripts at application start-up. This also makes it easier to test deployments, as it becomes more obvious what state a particular database should be in. I’ve never understood why Flyway isn’t more commonly used. I think the main objection was that it requires a little more care in writing database scripts, taking care to make sure scripts are backwardly-compatible.

The advantage of a small test project is being able to test adding things without worrying about complicated regression problems. Adding flyway on its own also means that I can then add Spring Data on top of this and the database structure will always be under version control. Flyway has been chosen here since it uses standard SQL scripts rather than the custom language used by liquibase.

With Spring Boot, only two files needed to be edited to provide flyway support. The first was some additional dependencies to the build.gradle file:

compile "org.flywaydb:flyway-core:4.0"
compile("org.springframework.boot:spring-boot-starter-data-jpa")
compile 'mysql:mysql-connector-java:5.1.38'

I also added a new src/main/resources/application.properties file which contained the database parameters. These are taken from environmental variables, meaning that the database credentials are not stored in the git repository anywhere. It also means the same war file can used on any server.

spring.datasource.url=${DB_URL}
spring.datasource.username=${DB_USERNAME}
spring.datasource.password=${DB_PASSWORD}

These changes in their own are enough to get flyway working. The Spring Boot logs show some relevant output, and at the end a new table is added to the database:

show-tables

Adding database output to the application

The good thing about adding Flyway to the application before we have any database entries is that the database can be completely maintained through versioning. The next step is to add some more interesting database objects than a schema_version table.

I’m going to make a basic page displaying some page titles. On another occasion I can then connect this to Spring Integration to make a simple RSS reader. I’m going to summarise the changes that were made rather than go into them in detail as there are good Spring Guides on accessing data through JPA.

Gradle

A new dependency was needed in the gradle script to set up thymeleaf

compile("org.springframework.boot:spring-boot-starter-thymeleaf")

There was also a missing dependency needed to set up Tomcat. While there was a war file being produced beforehand, it was not doing some of the more advanced setup:

providedRuntime 'org.springframework.boot:spring-boot-starter-tomcat'

Database Script

There is a simple database script in src/main/resources/db/migration which creates an entries table and adds a couple of entries.

Thymeleaf templates

There is a new index template in src/main/resources/templates, where the body iterates through the entries in the feeds table:

<body>
 <p th:text="'Hello, ' + ${name} + '!'" />
 <p th:each="entry : ${entries}"
 th:text="${entry.title}">"${entry.link}"</p>
</body>
</html>

Entry.java

We add a new database entry object, which links to the entries table and contains two properties, title and link.

EntryRepository.java

A standard Spring Data repository containing a findAll() method.

Greeter.java

This class required a number of changes to use the repository class as well as to enable it to work with Tomcat. Spring MVC was used to provide values for the templates:

model.addAttribute("entries", entryRepository.findAll());

The main catch was changing the class to provide a new definition:

@Controller
@SpringBootApplication
public class Greeter extends SpringBootServletInitializer implements WebApplicationInitializer {

There was also a new method needed to supply the basic configuration.

 @Override
 protected SpringApplicationBuilder configure(SpringApplicationBuilder application) {
 return application.sources(Greeter.class);
 }

Deploying to RDS

Setting up the RDS instance in AWS was relatively easy. The free tier I’m currently using provides a free small database, and there’s even a checkbox during set-up to restrict the available choices to ones under the free option. The contextual help here is excellent. With little work it was possible to set up a user on the instance and access them remotely.

There was an option in the AWS set-up to add the environmental variables for the Elastic Beanstalk instance. This supplied the database credentials to the war file.

Deploying the war to AWS via Jenkins required no changes, as it was already set-up. The only problem I had centered around making the database instance accessible to security groups – which would have been solved if I’d RTFM’d.

Conclusion

The main takeaway from this is that continous deployment is not, in itself, a complicated thing. It’s not taken long to set up a proof of concept, with a database backed site updating through Flyway. This basic model would be easy to replicate.

I’m going to make a few more additions to this example, adding Spring Integration to read from an RSS database, and some tidying up on the front end, most likely with Angular and Bootstrap. This will then provide the basis for building quick Java application prototypes.

And, of course, the information from these posts will be tidied up and incorporated back into my Java infrastructure posts.

Categories
continuousdelivery

Simple continuous deployment from Jenkins to AWS

I’ve been working away at my Java infrastructure series, but I had a spare afternoon, so I thought I’d play with continuous deployment to AWS. I used the current version of the infrastructure project as a basis, and followed Adao Feliz’s tutorial. I needed to make a few amendments to get it working, so I’ve noted these below.

Setting up continuous deployment for such a simple project may not be rocket science, but it provides a good basis for any further development – and it’s a lot easier than converting an existing project!

One significant change I did was converting the Spring Boot project I had to create a war file rather than a jar file. This required updating the Gradle file and making some changes to the Java file.

The instructions from the blog post are straightforward and in six steps:

  1. I already had jenkins running, and a github repository.
  2. I installed the new Jenkins plugins…
  3. …the S3 set-up was simple…
  4. …and the Elastic Beanstalk set-up was also very simple
  5. I used a copy of an existing Jenkins build, with no need to make amendments
  6. The only problem I had was with the deployment configuration, which seems to have changed a little since the tutorial I was following. The AWS credentials had to be added separately, at Manage Jenkins -> Configure System. Also, the version label format didn’t take some of the Jenkins variables I used, but build-${PROMOTED_NUMBER} seemed to work fine.

The result is simple but exciting. I commit a new change to the git repo, Jenkins picks it up then tests, builds and deploys the project. All it does at the moment is print a simple string, but it’s not going to be too hard to add in a database. But that can wait until next weekend!

Categories
infrastructure

Java Infrastructure Part 7 – Adding coverage checking

Coverage testing is considered to be an essential part of development nowadays, but I don’t think many people reflect deeply enough about what it involves, and why they are doing it.

Coverage tools measure how much of the code is exercise by the tests that are run and, broadly, a higher number is better. But it doesn’t tell you how good the tests are. You can have problems such as high coverage with redundant tests, code being exercised without being tested properly, and unmaintainable test code. Sometimes coverage is used as a replacement for understanding unit testing.

The other important question is how high the coverage should be. 100% coverage is extremely hard to achieve, so much so that many people suggest it is a waste of time. Having said that, all other levels of coverage are somewhat arbitrary. Some places I’ve worked have aimed for an ‘appropriate level of coverage’, but never have time to review and enforce that.

Good  coverage is difficult to add retrospectively; easily testable code needs to be written in a certain way. The Michael Feathers book Working Effectively with Legacy Code is still an excellent guide to salvaging untested code, despite being almost 12 years old. Actually implementing Feathers’ recommendation takes a care and diligence that few people bother with. It’s better to aim for excellent coverage from the start.

The good thing about having very little code in our new project is that we can get our coverage up to 100%.  Adding jacoco is a simple matter of putting a single line into the build.gradle file:

apply plugin: 'jacoco'

The jacoco reports can then be produced locally with the command  ./gradlew clean test jacocoTestReport

The test case covered the Greeter class’s greet method, but not the main method. Perhaps controversially, I’ve chosen to remove this method rather than add a test for it – this was originally used as a test harness and that behaviour is not needed when we have the unit tests. And less code means less to keep track of.

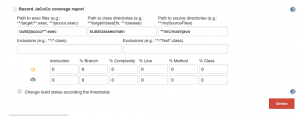
Something interesting happens when we add the jacoco reports to Jenkins. Initially I’ve added the Jacoco reports to the main job for the project. This doesn’t matter when the project is small, but will become a problem later on. We want to maintain a fast response to errors. The current run is taking about 30 seconds, which is on the outside edge of acceptability.

A new post-build action for Jacoco

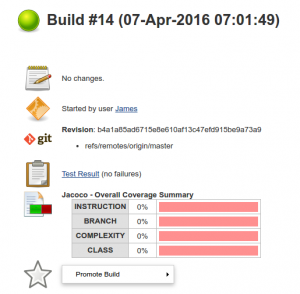
A problem comes with the results for the build. No coverage results are produced, and an error occurs on the Jenkins command line although not the build: java.io.IOException: Incompatible version 1006

Jacoco results are not working

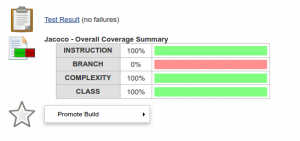
The problem here is that the Jenkins gradle plugin doesn’t work with all versions of Jacoco. This appears to be a problem with gradle versions which can be solved by forcing version 0.75 of gradle. This is now working:

jacoco

(The branch coverage is at zero because the code currently has no branches)

The problem with this adding this line to the build file is that it is a significant piece of technical debt. We have one tool’s version restricted due to compatability with one. This may cause problems if we introduce another tool requiring a specific version; and we have to keep track of when to remove the version. It doesn’t take long for the purity of a greenfield development to disappear.

The commit for the latest version is 2f7307d. Next it’s time to look at adding Spring Boot to the project.