Categories
infrastructure programming

Living Without Pre-Production Environments

Would we be better off without test environments?

I try not to recommend too many talks, but I loved this one from Nicky Wrightson of Skyscanner about living without pre-production environments. It provides an interesting solution to a lot of problems with performance environments I’ve been thinking through. Trying to accurately reproduce live environments seems like a wasteful, quixotic endeavour and I kept wondering about was just not using them. This video is an encouragement to that thinking.

Talks are often very different to the reality in companies, but there are some great questions for anyone about what test environments are for. “Historically, we had lower environments that were like production so that we could test releases that we couldn’t confidently reason about the effect of the changes.”

The only performance test that actually matters is how the live environment. ”At the end of the day, just make it a lot easier to track issues in production with really well instrumented code rather than try to replicate those issues in lower environments”.

There will always be inherent differences between environments, which limits the ability to draw conclusions from them. Yes, H2 is great for integration testing, but it has subtle differences with Oracle and MySQL which need managing. In performance tests, replicating load is hard – data and traffic shapes are as important as infrastructure and code. And then there are all the environment specific configs to manage, and the bugs from that.

Obviously, doing away with testing environments is the sort of decision that gets people fired. But! Just imagine how much things would improve if it worked!

Categories
infrastructure programming

What’s So Special About Cloud Software?

One of the more interesting interview question I’ve been asked in the past few years was about the differences between cloud development and monoliths. I don’t think I gave the expected answer when I said that they’re not all that different

Yes, cloud environments are complicated but good cloud development relies on the sort of fundamentals that sometimes go wrong in monolith development.

Co-ordinating subscription renewals, credit card billing and confirmation emails is an example of working with distributed systems on a monolith. Do this in the wrong way and you billed a customer multiple times, or spammed their email. Trade-offs, failures and retries needed to be carefully considered.

A lot of applications take external systems for granted, rather than considering that they do sometimes go wrong. One place I worked coupled their login process to Salesforce. When Salesforce had an outage, their monolith shared it. When local filesystems have issues, applications will fail dramatically.

There are obvious differences between cloud and monolith development (not least the operational complexity), but both require an attention to the principles of software development. You don’t need a large system to be hit by the fallacies of distributed computing.

Categories
infrastructure programming

Why Use Couchbase?

Back in the Noughties, when I first started web programming, data storage choices were straightforward. Your options were limited to RDBMS systems (Oracle if there was a budget, MySQL otherwise); if you to store binary data, then you could use file systems; and, in some cases, where the data was read-only maybe, you’d use a CSV file. Life was simple.

Back then, when I first heard the term ‘NoSQL’, I dismissed it. It’s never good to define something as what it isn’t, and the lack of a structure query language didn’t sound that compelling. But, over the years, NoSQL datastores have become essential, with some of them not being promoted as databases as such. The first one I used extensively was Lucene, which I didn’t really think of as a datastore. (Arguably, it isn’t strictly a datastore, but that’s another discussion).

Now there is a wide range of choices, each with their own specific use cases. I was recently tasked with looking into Couchbase, and the first question to answer is, why use Couchbase at all?

For an overview of Couchbase we can turn to a Linked in blog post on Couchbase’s evolution:

Couchbase is a highly scalable, distributed data store that plays a critical role in LinkedIn’s caching systems. Couchbase was first adopted at LinkedIn in 2012, and it now handles over 10 million queries per second with over 300 clusters in our production, staging, and corporate environments. Couchbase’s replication mechanisms and high performance have enabled us to use Couchbase for a number of mission-critical use cases at LinkedIn.

Wikipedia provides a good summary in their Comparison of Structured Storage software. We can see that Couchbase is a document storage solution, similar to MongoDB, but adding high availability functionality.

Couchbase started as a memcached replacement, adding in features like persistence, replicas, and cluster resizability. Its use as a backend to LinkedIn has demonstrated its potential in large deployments, with LinkedIn having, at one point, “over 2,000 hosts running Couchbase in production with over 300 unique clusters”. Or there were the 100 hosts used for Draw Something – 2 billion drawings were stored, at a rate of up to 3000 per second.

One of the interesting problems with learning a lot of modern technologies is that their potential only really comes out at scale. Speaking as a developer, I would be hard pushed to find a reason to use Couchbase above Mongo unless the use case involved master/client on mobile, or a website I expected to scale massively. But it is easy to get started with a basic Couchbase site thanks to JHipster and docker.

There are clear instructions online for getting going with JHipster, and having a working Couchbase application could be managed within about an hour, even with no JHipster experience. The basic steps are:

  • Install JHipster
  • Start JHipster and run through the basic application creation options. It’s easiest to work with a monolithic application if you’re new to JHipster. Make sure to pick Couchbase as the database, but otherwise the defaults will work well enough.
  • In the newly created application folders, go to the src/main/docker folder, and type the command ‘docker-compose -f couchbase.yml up’
  • In the main JHipster folder, use the command ‘./gradlew’ to build and run the Spring Boot application.
  • The application can then be viewed at http://localhost:8080. I had to use Chrome to get this working successfully.

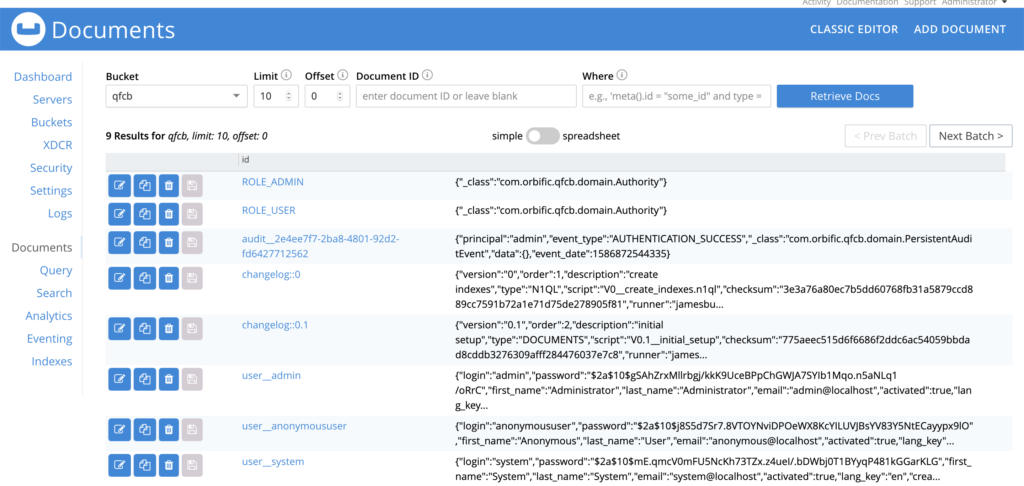
The basic JHipster application, with no customisation includes a basic usermanagement system. The couchbase docker instance can be accessed at http://127.0.0.1:8091/, username ‘Adminstrator’, password ‘password’.

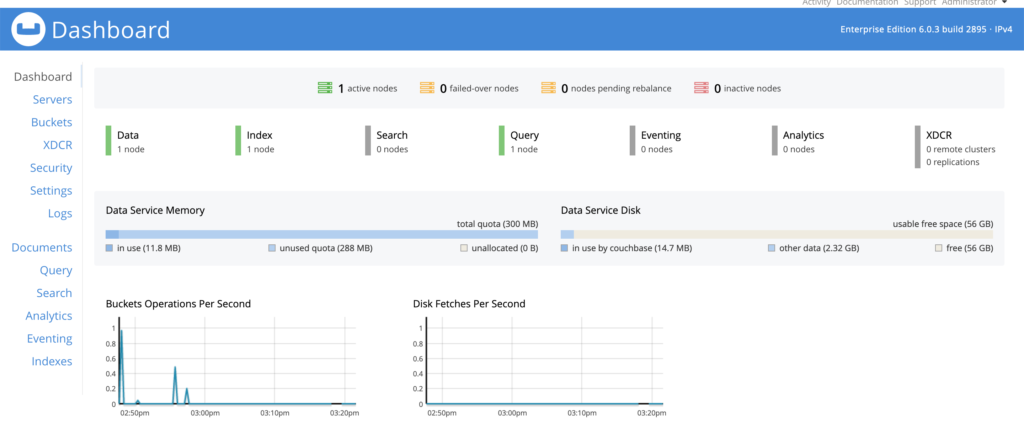
Clicking through to the ‘Buckets’ option on the left-handside menu shows the different data partitions available. Clicking on the ‘Documents’ link for the partition we have created shows the basic user data that has been added.

This is not much of an application, but by following the JHipster instructions for creating new entities, we get CRUD options for new pieces of data. While this produces a relatively simple application, JHipster has produced an entire stack, including Spring Data Couchbase. The work so far could be customised to provide a full application, or used as a working example of how to integrate Couchbase into a Spring Boot application. (One advantage of JHipster is that the application produced can be subsequently developed without reference or use of JHipster.)

Categories
infrastructure

Microservice Lessons For Monoliths

InfoQ recently published a new talk by Adrian Cockroft, Managing Failure Modes in Microservice Architectures.

It’s a good talk, but I think the title is a little restrictive. Many of the problems with microservices are problems with all computer systems – it’s just that microservices punish mistakes more brutally.

In a recent job interview I was asked if I could deal with the specific demands of microservices when (the interviewer felt) much of my experience involved monoliths or small groups of services. My response was that principles such as loose coupling, monitoring, and resilience are needed in all systems .

It’s a rare system that has no external dependencies. I once worked with a monolithic system that made a call to Salesforce as part of the login process. When Saleforce went down, users could not log into the system. The issue was obvious – we had to manage failures in the external dependency. Microservices, by involving many more dependencies, force people to engage with this; or else, suffer massive disruption and downtime.

One of the most interesting things about Cockroft’s talk was his observation about the problem with disaster recovery:

Your switching processes, and code, and practices are not well-tested. You’ve got an unreliable switch between your primary and backup datacenter. You might as well just not have the backup datacenter.

The answer here is to make the failure systems part of the normal workings; to be constantly switching between datacenters, for example.

There was also an interested related point about the chaos monkey. This was not just about testing resilience:

We were enforcing autoscaling. We wanted to be able to scale down. If you think of an autoscaler scaling up and scaling down, to scale down, it has to be able to kill instances. The Chaos Monkey was there to enforce the ability to scale down horizontally scaled workloads. That was actually what it was for. It was to make sure you didn’t put stateful machine, stateful workloads in autoscalers. Then you can have this badge of honor gamified a bit. “My app survived all of this chaos testing, and it’s running in this super high availability environment, and your app didn’t. Do you mean your app’s not important?” You can gamify it a bit.

Many of the principles discussed in relation to massive companies such as Netflix are needed by everyone. The good thing about this is that the tools being produced empower companies of all sizes. Microservices enforce a more mature attitude to failure; but failures occur in systems of all sizes.


Categories
infrastructure

Deploying a prototype with JHipster

In my previous post, I looked at the minimal infrastructure for a hobbyist webapp in JHipster. Now I want to look at the process for putting a prototype into production.

What do I mean here by a prototype? I mean a simple first cut of a production site. It needs to be simple, while achieving the standards required of a professional site. It also needs to be better documented and reproducible than a one person hobby-site: I should be able to hand over the code and documentation to another developer and never have them call me for help.

The background to this post is a requirement to produce a simple platform for a local company. The work needs to be supportable by other people, as I don’t want to be the only person who can work on this. This project provided a good opportunity to look at moving beyond the hobby-site model.

Ultimately, the changes made on top of what was done last time are adding continuous integration; planning zero-downtime deployment; and sketching out a roadmap for the future.

Platform

In the previous post I discussed the trade-offs between AWS and Digital Ocean. AWS has powerful infrastructure, but is only worth taking on when the infrastructure costs are lower than the additional time needed to manage that infrastructure. There also needs to be a commitment to pay the ongoing platform costs, when long-term budget and timescales are not yet set. For the same reason, I dismissed the idea of a managed database, preferring the quick and cheap option of installing MySQL on the server.

For this initial prototype set-up, I think we are still at the stage where digital ocean has the lead. However, one of the downsides of this is losing a resilience in the system, so good monitoring needs to be in place.

Jenkins

As this is a professional site, the deployments need to be accountable – which means the builds need to be repeatable. JHipster provides support for setting up continuous integration, and this is so simple that it is inexcusable not to use it. By using Jenkins for production builds we can be sure these are done correctly, with no danger of files outside version control polluting the project.

I added a new digital ocean server using their Jenkins tutorials and soon had a CI server up-and-running. The first time I tried this, I had a few problems with the machine running out of memory, but assigning some virtual memory fixed this.

A basic change deployment process

A deployment process should be completely automated – that way you can be sure the process takes place the same way every time. However, if the process has not been automated, it does at least need to be documented.

If the process is not being automated at the start of a project, then some critical thought needs to be given as to when this will happen. As more features get added, performing an automated deployment only gets more complicated. It’s technical debt: over years, days can be lost on something like manual deployments, while time can’t be found to fix things there and then.

At this stage I am assuming a single production server, configured as in my previous post, ie with an Apache Server to handle HTTPS connections and proxy to the application server.

The deployment process should be clearly documented so that anyone working with the site can find it. That process will look something like this:

  • Create a ticket, summarising the changes that need to be made. You might not use Jira, but some sort of tracking system should be used, to provide a trail of events.
  • Define a series of (preferably automated) tests that will define whether the changes are successful.
  • Create a branch, add the tests and make the changes. Database updates must be backwardly-compatible and work with both the new and current version of the application (for example, take care removing columns).
  • If a code reviewer is available, they should review the changes before they are merged. If everything seems fine, the branch should be rebased against master then merged.
  • The changes are picked up by Jenkins and a production jar is produced.
  • The production jar is started using a new port via a command line option (-Dserver.port=XXXX). If database changes are included in liquibase, they will be applied at this point.
  • The Apache configuration is amended to point to this new version. Apache is then restarted
  • The old application server is removed.

We could use a load balancer for the deployments, which currently costs $10.80 a month on digital ocean. This would offer several more options for deployment, but these would also add costs and take more time to set up.

As we are using JWT, users don’t notice the switch of servers. There are issues with JWT, such as the difficulty of repudiating tokens when we need to end the session, but that is not an issue in this case.

Recovery

One of the most interesting trade-offs in these systems is between preparing for the possibility of error or dealing with the issues that actually occur. Getting a site close to 100% uptime is incredibly expensive – for example, what if the provider suffers an outage? should you be able to fall back to another cloud provider? Time/money might be better spent on getting things out there and exploring user responses.

I would suggest there are two important things to consider:

  • Given the time/money trade-off, what are acceptable SLAs for this simple site?
  • If the whole system were to be deleted, can the site be rebuilt in a sensible amount of time? How much data would be lost?

What’s missing

The above outlines what I would need for a minimum viable site deployment. There is some distance between this and what I would expect from a fully-featured production webapp. I will cover these in future posts:

  • A full continuous integration pipeline, including quality assurance tools such as Sonar and findbugs.
  • A more nuanced git branching strategy.
  • Spreading the site across multiple hosts, increasing the robustness and allowing scaling.
  • Capacity and error logging/alerting. This needs to be persistent, and to immediately communicate serious problems. Ideally, load spikes can be responded to automatically.
  • Better database recovery planning.
  • Clearer deployment tracking, so we can identify which version of the application a bug report occurred against.

The other thing to consider is at what point the savings would justify moving across to AWS.

Conclusion

The changes between this type of application and a hobbyist version are minimal, but JHipster supports us in getting continuous integration running, which is a great help. The main changes are tightening up the process, so that other people can become involved in this process as possible.

Categories
infrastructure

Deploying a hobby site with JHipster

This is the first in a series of posts looking at JHipster deployment. This post considers the most basic deployment. Later posts will look at more maintainable set-ups, including continuous integration and deployment pipelines

For me, one of the most exciting things about JHipster is that it makes it feasible to build hobby websites on a full-stack Java/Javascript platform. Basic functionality can be added within a few hours, and pretty good user administration comes as standard.

But, for all web-applications, getting from a feature-complete version to a live application can be a problem. There are several things to consider such as reliability, monitoring and security. This post looks into the minimal configuration required for a hobby site. I’m planning to maintain it as a work-in-progress, so if you have any questions or suggestions, please leave a comment below.

What do we mean by a hobby website?

By ‘hobby website’, I mean something that is created and run for fun. Since it’s not intended to make money, the requirements for uptime and stability are lower than a professional site, and we are probably making a few shortcuts in terms of process. We want it to chug along by itself and check in with it at weekends; we assume we will get pinged for errors, but we won’t respond to them immediately. And we also probably want to spend more time working on code rather then infrastructure.

Indeed, I suspect most people considering a hobby site are not going to run full test suites. While proper testing is more efficient in the long run, and essential on large or collaborative projects, some people enjoy the immediacy of seat-of-the-pants development. Certainly, reputational risks are lower when doing a hobby website. I’m not saying that it’s correct to avoid setting up a proper process with continuous delivery – but for most people that’s not what they want from a project they work on in their spare time.

Platform

Unless you have a very generous employer, you’re going to need somewhere to host the application and in the long term, this will cost something. If you’re eligible for the free tier on AWS, or GCP’s free offerings, that’s a great help, otherwise you’re looking at a paid option. While a lot of people offer virtual servers, two popular options are Amazon’s AWS and Digital Ocean.

While AWS is a powerful and sophisticated platform, it’s probably overkill for most hobby sites. Setting up an AWS account involves a number of subtleties, and the additional features can be expensive. So, while I would tend towards the power of AWS for a commerical application, I favour Digital Ocean for hobby sites and simple deployments. Digital Oceans’s virtual servers are about half the price of an Amazon server ($5 a month for the lowest level, $10 for something a little more powerful). Since we’re talking about sites that aren’t going to make money, reducing costs is probably good.

Getting a server up-and-running on Digital Ocean is straightforward, and they provide great step-by-step tutorials. The first step is the basic server set-up. Digital Ocean seem to be offering a managed database service, but it’s also easy to install MySQL and set up a new user.

Setting up email is best done through a third-party supplier. Mailgun‘s SMTP service is easily to configure with JHipster, and offers up to 10,000 emails a month for free.

Running the app

There are various options for running an app on a server, and Spring Boot’s documentation has a section on deployment and installation of Spring Boot apps. The main takeaway from this is do not run the Spring Boot application as root.

I’ve actually been quite lazy. Rather than setting up a service, I ran my application from the command line and backgrounded it. I wouldn’t do this on an app I was producing professionally – but I have a monitoring service on the app and it’s stable enough for my needs.

One other thing – the Spring Boot app should be listening on port 8080, since we’re not going to have it communicating directly with the internet. Instead, we will use an Apache proxy to handle HTTPS:

HTTPS

HTTPS is a non-negotiable part of any web project these days. You can run a web application over HTTP but:

  • Browsers will give lots of warnings and this provides a horrific user experience (and quite rightly so!)
  • You’re risking users sending sensitive data in the clear. Many users have horrible password strategies, and reuse the same one for multiple sites. So, an error on your site risks exposing other accounts and causing catastrophic loss for that user. While you aren’t responsible for other people’s bad password management, eliminating unnecessary risks is good.

Spring Boot supports HTTPS, but it’s a bit of a hassle to set up multiple connectors so that an app can listen on both HTTP and HTTPS so that HTTP requests redirect to a secure connection. Given the efficiency of the EFF’s Certbot scripts, it’s easier to set up Apache as a reverse proxy. In addition, terminating the HTTPS connections with Apache makes sense as Apache is better at managing HTTPS than Spring Boot.

Once again, Digital Ocean offers some useful tutorials on installing and setting up Apache and using certbot to set up HTTPS. Certbot configures the apache instance to redirect HTTP requests to HTTPS.

The basic set-up in the tutorials is for a static site, but it’s a simple matter to updatew this. First, from the command line, enable some additional Apache modules:

sudo a2enmod proxy
sudo a2enmod header
sudo a2enmod headers
sudo a2enmod proxy_http

Then, finally, remove the DocumentRoot directive from the ssl.conf configuration and add in the lines to proxy HTTP requests to port 8080:

ProxyPreserveHost on
RequestHeader set X-Forwarded-Proto https
RequestHeader set X-Forwarded-Port 443
ProxyPass / http://127.0.0.1:8080/
ProxyPassReverse / http://127.0.0.1:8080/

Preventing Terrible Things

Whenever anything is put live on the Internet, thought needs to be given to the risks and costs involved. It’s impossible to be 100% safe, but obvious problems need to be prevented. We don’t want our hobby website to ever give us a horrible sinking feeling that something has gone very, very wrong. So it’s worth thinking about the things that could go wrong with any application exposed to the internet:

  • Running up massive bills with a hosting provider through insecurity in our user account with them.
  • Leaking user data (which has potential legal ramifications)
  • The host being compromised, allowing it to be used for nefarious activities
  • Losing user data (which might annoy people, causing them to annoy us)

The measures discussed in this post should mitigate most of these risks, but you should take time to consider things such as data and password security to make sure you’re comfortable with the application you’re running.

One thing to be aware of is that all dependencies should be regularly upgraded to make sure the latest versions are used. The JHipster upgrade tool is provided for this.

This is a good point to remind you that care must be taken with the secrets stored in the JHipster application’s application-prod.yml file. Do not carelessly commit these secrets to git and then push to a public repo. Sounds obvious, but JHipster automatically adds this file to the repository.

Database Backups

Any application which creates and maintain data needs some sort of backup. A manual solution is going to be more hassle than it’s worth, as is a full up-to-the second solution, such as would be used on a professional site.

One option is to pay a little extra to use the new managed (Postgres) database services on Digital Ocean, and let them handle backups. I’ve gone for a quick-and-dirty daily backup using automysqlbackup with the files produced rsynced automatically to another server. It means a catastrophic failure could wipe out up to 24 hours of data, but the solution was something I could set up in 15 minutes, and I am OK with the risk.

Monitoring

Given the simplicity of the app I’m working with, I’ve not bothered producing persistent monitoring of the application beyond the logs on the server. If, for some reason, the Digital Ocean server vanishes, these will be gone. I’m OK with that.

However, I do want to know if, for any reason, the Java application server falls over. I’m using Uptime Robot‘s free offering to email me if the app’s homepage stops responding. This is enough for the first version of my application.

Thank you to Laurence Barry and Alex Tawse for their feedback on a draft of this post
Categories
infrastructure

Setting up an online radiostation

Recently, I was set an interesting challenge: set up an Internet radio station. I knew very little about this but was relieved to find out it was easier than expected.

Having reviewed the different option, the best one seemed to be icecast2, which is actually the backing for a lot of commercial services. Getting the basics up and running was relatively straighforward, with a couple of gotchas.

Virtual Server

I used a digital ocean server to host the radio station. These are reasonably-priced servers, with 1TB of transfer on the basic level. The physical hypervisors have about 1GBps. In a 4-year-old forum post, it was suggested that “You should expect and plan on 300Mbps of available bandwidth (up and down) in order to plan your deployment and get the most out of your services.”

This covers a decent number of users, and hitting this limit would be a nice problem to have. Potential solutions in this case would finding a way to peer the radio through a more powerful icecast server. As far as bandwidth use went, looking at someone else’s calculations suggested that this would not be a problem in my case. So, I set up a basic digital ocean server to see how that would cope.

The server I went for was a little beefier than the basic model, with 2 CPUs and 3TB of transfer – far more than was needed. Within a few minutes I had a server set up.

Icecast

Installing icecast is easy on ubuntu using the standard repositories. During testing we had a number of issues that seemed to be caused by not using HTTPS. In the end, it turned out that these were actually caused by using Ogg rather than MP3 for the streams. This was a good thing to discover, as getting HTTPS support working was quite a chore.

I found a good guide to setting up Icecast and Liquidsoap on the Linux Journal site: Creating an Internet Radio Station with Icecast and Liquidsoap, and it’s worth following this closely.

However, these versions of Icecast do not include SSL support. Doing this requires building icecast from source, using the SSL option. However, installing from source doesn’t do a great job of setting up the software locations and services.

I ended up settling on a slightly weird way of installing icecast, by using apt-get to do the config, then compiling and installing the binary from source.

I was fortunate to find some helpful documentation for compiling icecast with SSL. However, this needed a little tinkering, mainly due to dependencies and the commands I needed were:

sudo apt-get update
sudo apt install git gcc build-essential libcurl4-openssl-dev libxslt1-dev libxml2-dev libogg-dev libvorbis-dev libflac-dev libtheora-dev libssl-dev autoconf libtool pkgconf
mkdir src
cd src/
git clone --recursive https://git.xiph.org/icecast-server.git
cd icecast-server; ./autogen.sh
./configure --with-curl --with-openssl
make install
mkdir /etc/icecast2
mkdir /var/log/icecast2

I then copied the pre-prepared icecast config file into /etc/icecast2, along with the pre-prepared SSH certificate file. Then there were some last bits of set-up. I had to explicitly enable the icecast daemon in /etc/default/icecast2 to declare I had changed the passwords (done via copying across the config)

chown icecast2:icecast /etc/icecast2/icecast.*
systemctl enable icecast2
systemctl start icecast2

At this point, the icecast server would be visible on port 8000. I had to do a little work to ensure that the correct XSL files were being pointed to, but it was fairly obvious (from a 500 error) that this needed changing.

Liquidsoap

While icecast handles the streaming, a second application is needed to generate those streams, and this is the role of liquidsoap. Again, the basics of this were provided by some helpful documentation online, this time from the linuxjournal.

adduser liq
gpasswd -a liq sudo
apt-get install opam
su - liq
opam init
# say yes to changing profile
eval opam config env
opam install depext
opam depext taglib mad lame vorbis cry ssl samplerate magic opus liquidsoap
opam install taglib mad lame vorbis cry ssl samplerate magic opus liquidsoap
sudo mkdir /var/log/liquidsoap
sudo chown liq:liq /var/log/liquidsoap/
mkdir /home/liq/archive
mkdir /home/liq/playlist

I then copied across the liquidsoap config file, and tested it – liquidsoap complained about a fallible source, as there was not yet a fallback file in place. The script I’m using has a test.mp3 file defined in the configuration that can be used when all other sources fail.

Other tasks

I needed to copy some other people’s SSH keys to the server to allow them to work on it. Then I needed to set up apache, and configure the firewall. Digital ocean provide instructions for this, which are comprehensive and include firewall management. Once basic apache was set up, I created the new vhost for the station and transferred the pre-prepared configuration files. Then test that this configuration was successful.

Pointing the DNS to the new server is simple enough, but there are also SSL certificates needed for both Apache and icecast. The simplest way to do this is via certbot

sudo add-apt-repository universe
sudo apt-get update
sudo apt-get install certbot python-certbot-apache
certbot --apache

There is also a certificate needed for icecast, as some players are unhappy with unencrypted streams.

cat /etc/letsencrypt/live/pilgrimradio.info/fullchain.pem /etc/letsencrypt/live/pilgrimradio.info/privkey.pem > icecast.pem

Other things

I used uptime robot to set up a basic monitoring service for the site. Compiling the appropriate liquidsoap script took some work, but the main site had some great examples.

We needed a website to send people, with links to the streams and audio players. This was easy enough to do, with the icecast admin screen providing example HTML for linking to the streams and embedded audio players. The related Apache server needs to have HTTPS set up, and Digital Ocean provide a simple Apache SSL tutorial using certbot.

I could write another whole post about scheduling and organising content, but that is for another day.The above is a rundown of some of the issues I faced. Every set-up is going to run into it’s own problems. I’m happy to try answering any questions left in the comments though.

Categories
infrastructure

Java Infrastructure Part 7 – Adding coverage checking

Coverage testing is considered to be an essential part of development nowadays, but I don’t think many people reflect deeply enough about what it involves, and why they are doing it.

Coverage tools measure how much of the code is exercise by the tests that are run and, broadly, a higher number is better. But it doesn’t tell you how good the tests are. You can have problems such as high coverage with redundant tests, code being exercised without being tested properly, and unmaintainable test code. Sometimes coverage is used as a replacement for understanding unit testing.

The other important question is how high the coverage should be. 100% coverage is extremely hard to achieve, so much so that many people suggest it is a waste of time. Having said that, all other levels of coverage are somewhat arbitrary. Some places I’ve worked have aimed for an ‘appropriate level of coverage’, but never have time to review and enforce that.

Good  coverage is difficult to add retrospectively; easily testable code needs to be written in a certain way. The Michael Feathers book Working Effectively with Legacy Code is still an excellent guide to salvaging untested code, despite being almost 12 years old. Actually implementing Feathers’ recommendation takes a care and diligence that few people bother with. It’s better to aim for excellent coverage from the start.

The good thing about having very little code in our new project is that we can get our coverage up to 100%.  Adding jacoco is a simple matter of putting a single line into the build.gradle file:

apply plugin: 'jacoco'

The jacoco reports can then be produced locally with the command  ./gradlew clean test jacocoTestReport

The test case covered the Greeter class’s greet method, but not the main method. Perhaps controversially, I’ve chosen to remove this method rather than add a test for it – this was originally used as a test harness and that behaviour is not needed when we have the unit tests. And less code means less to keep track of.

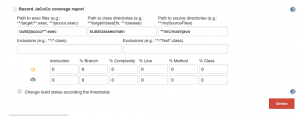
Something interesting happens when we add the jacoco reports to Jenkins. Initially I’ve added the Jacoco reports to the main job for the project. This doesn’t matter when the project is small, but will become a problem later on. We want to maintain a fast response to errors. The current run is taking about 30 seconds, which is on the outside edge of acceptability.

A new post-build action for Jacoco

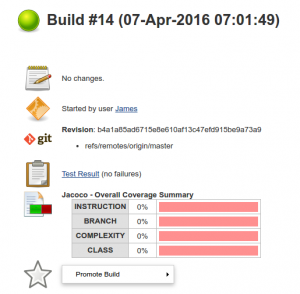
A problem comes with the results for the build. No coverage results are produced, and an error occurs on the Jenkins command line although not the build: java.io.IOException: Incompatible version 1006

Jacoco results are not working

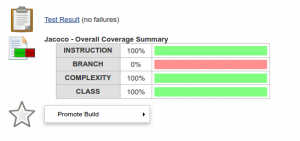
The problem here is that the Jenkins gradle plugin doesn’t work with all versions of Jacoco. This appears to be a problem with gradle versions which can be solved by forcing version 0.75 of gradle. This is now working:

jacoco

(The branch coverage is at zero because the code currently has no branches)

The problem with this adding this line to the build file is that it is a significant piece of technical debt. We have one tool’s version restricted due to compatability with one. This may cause problems if we introduce another tool requiring a specific version; and we have to keep track of when to remove the version. It doesn’t take long for the purity of a greenfield development to disappear.

The commit for the latest version is 2f7307d. Next it’s time to look at adding Spring Boot to the project.

Categories
infrastructure

Java Infrastructure Part 6 – Unit testing

I’ve been using JUnit for about fifteen years. In that time it has become a central part of Java development. While that’s great, unit testing is still problematic. Most people agree that automated testing is necessary, but its exact form is more controversial.

There are two main candidates for a unit testing framework, JUnit and TestNG. These packages have very different aims – in Senior Developer interviews I would sometimes as the difference between them. I like the question as there are a lot of right answers and the chosen response says a lot about the developer.

The simplest answer is that they are broadly similar. They do have a different order of argument in their assertions, which has led to TestNG having a separate class with JUnit assertion order.Some companies I’ve worked for have solved the problem of using JUnit or TestNG by going for both – and then used both argument orders for TestNG.

There’s a good JUnit/TestNG comparison on Mykong.com which points out that the main difference between the two is that JUnit doesn’t have some of the features included in TestNG. But the best answer (which I never received) is that the philosophy of the two are very different. JUnit is a unit testing framework, and as such does not encourage certain practises, for example, having tests that need to run in a particular order. JUnit 5 Alpha was recently announced and the new features don’t appear to violate this goal.

There are often problems with what unit testing actually is. Unit tests should be small, independent, deterministic and low-level. They should not have any direct dependencies on files, database or underlying OS (random number generation, current time, etc). Tests at higher levels are important too, but these should be clearly separate. By not following these rules, developers risk producing slow, brittle unit tests that require complicated set-up. Good unit tests actually force the code to be written in a more testable way, reducing dependencies, and using smaller elements.

Adding tests to the project is simple enough. There is a new class, GreeterTest, and a few lines in the build.gradle file. The changes to the build include a JUnit dependency, which in turn means adding a link to the central maven repository. Gradle is written so that dependencies can be added with little trouble, but this does bear thinking about a little. How does one know that the files being downloaded have not been tampered with? Are we accessing these repositories efficiently? This will be discussed later in detail later, but meanwhile we need to add a note to the TODO page.

Some years back, I gave a talk on unit testing. It was about an hour, and still only scratched the surface. While unit testing is easy, it introduces a lot of issues around how a project will work. I’ve seen company after company get tangled in unit tests. Simply adding JUnit to a project is not enough without some consistency and a real rigour is needed around how tests are used.

An example with this is the use of set-up methods in the tests. These become complicated, and end up with test subclasses and classes, making fixing tests a chore. Better to have the set-up in each individual test method, and if these become unwieldy then examining our object model. This then means that a broken test can be read from start to finish and understood on a single IDE screen. Yes, it produces duplication, but the aims of test code are very different to production code.

Introducing unit testing also requires the processes and infrastructure to support it. We’ve added Jenkins to the project, and broken unit tests will cause the build to ‘break’, to turn red. Continuous integration relies on tests running quickly, to allow a tight feedback loop for developers. Over time, slow builds become slower, and never quite get fixed. Also, the rules about not committing to a broken build need to be taken seriously. Too often, companies have unit test suites that break in specific ways, and developers are forced to understand when a broken build matters and when it is acceptable. This is far too confusing. Using unit testing means following certain rules and methods of development.

Adding JUnit to Jenkins is relatively simple. Make sure that the JUnit plugin is installed, then edit the build for the project to publish the JUnit results. The build will now fail if the tests fail, and full details can be seen within Jenkins.

jenkins-junit-plugin

The latest commit is a3b7fa1. In the next part, we’ll be looking at adding coverage checking to the project.


Categories
infrastructure

Java Infrastructure Part 5 – Introducing Jenkins

An interesting effect of writing a series of posts like this is how it clarifies your thinking. I originally planned to introduce a continuous integration server after Javadoc, JUnit and so on. But, as I’ve researched and thought about this, I’ve decided that a continuous integration server is a fundamental tool for development. It should be at the heart of any project.

Good development requires automation. Rather than have any steps carried out manually, we should automate them from the start. I’ve known colleagues who saw Jenkins as the powerhouse of an organisation; that one could have hundreds of jobs, not just passively monitoring repositories to run builds, but to promote code, run reports and even deploy software. Jenkins provides the plugins and the framework for a finely-grained permissions system, based on specific tasks, rather than all the underlying grants and credentials needed.

The problem with CI is that it takes a significant amount of investment and commitment to put in place retrospectively. An organisation that is able to deploy code manually may not feel excited about spending time and energy just to simplify those builds, even when deployments become unwieldy enough to prevent growth. CI also requires discipline – it takes a lot of courage to stop a large organisation until failing unit tests or transitory broken builds are resolved. It’s far easy to carry on with a broken system that seems to work than to push towards an efficient, modern build.

Jenkins runs inside its own application server, separate to the built software. It is available for download from http://jenkins-ci.org/, where there is a Java Web Archive available. The current version is 1.650 and, as discussed in the last section, we need to note this for later use as we scale up.

We need to introduce and document a new environment variable here, JENKINS_HOME, specifying the location where Jenkins stores its internal files. A major issue with Jenkins is that it doesn’t do a good job of separating code from configuration. This poses the question of how to run, maintain and restore Jenkins instances. I will avoid the question of restoration just now – I suspect it will be much simpler after virtualisation is introduced.

The command to run Jenkins is simple; java -jar jenkins.war. The server can then be accessed at its default location, http://localhost:8080/. Running Jenkins on a local machine is not really satisfactory in the long term, but will do for now.

Some initial configuration is required. Again, for the time being, this is system specific and can be found by clicking Manage Jenkins then Configure System. We can point to the current JDK or download a new one. Location of the JDK to be used is another ambiguity that must be dealt with.

I will  skip over some of the steps here – there are many good tutorials about Jenkins available, including a very useful O’Reilly book, which I have been using as a reference. The main steps I followed were:

  1. Install the git plugin (version 2.4.2)
  2. Install the gradle plugin (version 1.24)
  3. Install the blue/green balls plugin. By default, Jenkins has its successful builds shown as blue. The Jenkins blog notes that this plugin is in the top ten – and also points out that the red/blue colour scheme is a Japanese thing.

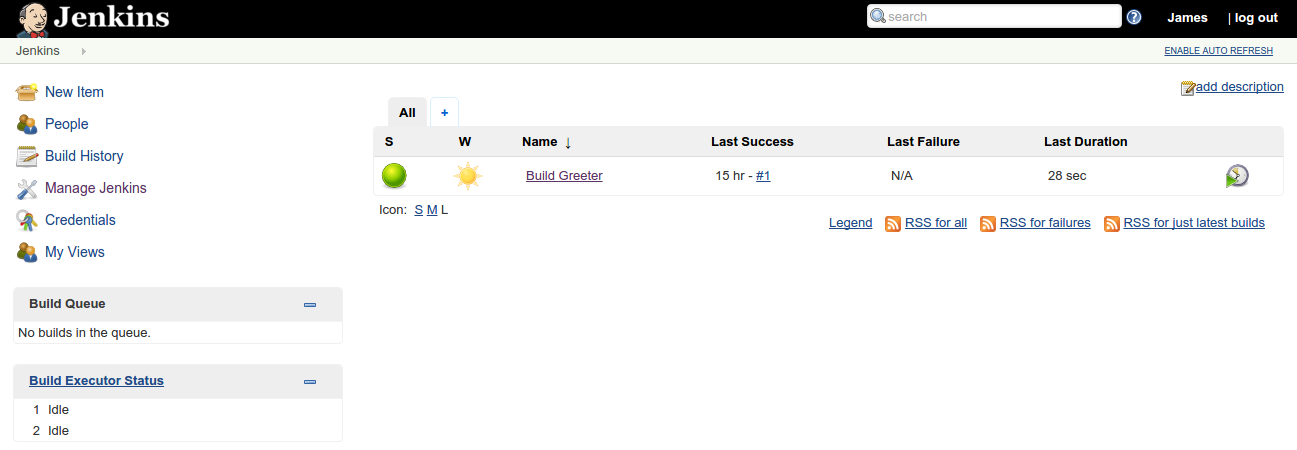
Having set up the basic environment, we add a new freestyle project to build our code. We use gradlew, with both the clean and build targets.

We test the build with running the jar, and that seems to work just fine.

Happy green build
Happy green build

So, there we have it, a slightly clunky local build of Jenkins. I wouldn’t say that this Jenkins set-up is particularly good.  However, even with those limitations, it provides a heartbeat for the upcoming stages of the project. If you’d like any more detail on steps that I’ve skipped over, please leave a comment and I’ll edit the text.

The latest commit on github is 392d98e