 Tldr; things looked bleak for Java in the mid-noughties, but the language and eco-system have undergone massive changes, allowing Java to thrive and survive.
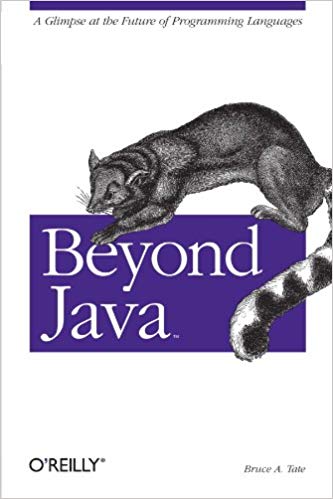
My new job has a daily commute, which means time to read. I’m focussing on tech books and recently picked Bruce A Tate’s Beyond Java. I originally read this in July 2006, the year after it was published. The book described why Java was doomed, with Tate saying in the introduction, “Java’s reign will end. It’s not a question of if but when.” (pviii). While the predictions have turned out to be wrong it is interesting to re-read the book and see how Java escaped its fate.
Revisiting the mid-noughties was fascinating in itself: a time when AJAX was just emerging, Web 2.0 was the next big thing and folksonomies would change everything. It was an environment that caused obvious problems for Java. Its flaky text-processing was just no good for large XML files, and Java was forced to deal with a lot of XML. In addition, Java tended to be used for the middleware on top of databases, which it was not particularly suited for (p52).
Even with early versions of Spring and hibernate, making Java applications was a chore, with overwhelming amounts of boilerplate and XML config. Even with ORMs, Java required you to work with both entities and database code, and to keep them consistent.
Tate talked about this difficulty in getting software running, and all the tools that were needed. Compared with PHP, Java felt slow to develop in, and its advantages weren’t sufficient compensation. It did seem that Java was on the ropes. I remember dropping out of Java to do simple text tasks. Ruby-on-rails and similar frameworks promised the chance to get applications running quicker.
The book is a pessimistic one. Tate saw the problems as unsolvable and, given Java’s history and trajectory, this was a fair assumption to make. Tate looked at Java critically and suggested other platforms developers should investigate. Reading the book with hindsight, one can see Tate’s predictions have failed, but the discussion is still interesting.
In the 12-or-so years since Tate was writing, Java has managed a comeback. Decent dependency management from maven and gradle has eradicated the nightmare of setting classpaths. The language has been made more expressive with new features, such as the functional constructs in Java 8. And the growing fashion for opinionated configuration has also made things easier – getting Spring Boot running is incredibly easy. The culture of the language has changed for the better too. In the past, checked exceptions proliferated everywhere, and now people tend more towards throwing runtime exceptions and handling everything at a single sensible point.
One particularly strong improvement is the Spring framework. At the time Tate was writing, Spring was a mess of XML configuration and cryptic errors. With annotations, it has become easy to use and unobtrusive. New platforms such as Spring Boot allow developers to release production-ready features out quickly. At the same time, Java/Spring offers a mature platform, where code can be taken to production and supported at massive scale. Ruby-on-rail’s promises have faltered, with Twitter famously moving to Java because of scaling issues. The XML problem has disappeared as JSON takes over as a less robust, easier to use standard. I don’t miss the days of choosing between SAX and DOM parsers for XML.
Around the time Tate was writing, a debate raged about variable typing: strong vs weak, static vs dynamic. Java’s static and strong typing felt too rigid for many people. This debate seems to have reached an interesting conclusion: Javascript has been restricted by typescript while Java 10 has introduced the var keyword.
(I’ve always seen the inflexibility of Java as a positive. While it’s less expressive than languages such as python or, um, perl, the code it produces tends to look very similar. It’s a good language for non-rock stars – who massively outnumber the sort of people capable of producing cryptic code given the slightest chance).
At the time of writing, Tate saw Java’s fate as connected with that of Sun. Tate wondered what might happen if Sun disappeared, wondering who might take over Java. The resulting situation, with Oracle running Java (and MySQL!) was hard to predict but has worked out well – even with the occasional fake news scare that Oracle would start charging for Java.
Tate discussed a number of contenders for Java’s throne. Perl has lost popularity over the last decade, with Python offering a more structured (and readable) alternative. Perl, like PHP, was a great tool for its time but ultimately a ladder to better things. The book makes a quick mention of functional languages: Clojure seems to have come and gone, but Scala and Kotlin (first released in 2011) seem to be gaining traction. Ruby itself is much less popular. Java seems to have been saved by the flexibility of the JVM, which offers more powerful options for those that need them.
For me, the most interesting discussion was around state in web-servers, and the problems of that. Tate talks about continuation servers as an upcoming opportunity. This is another debate that has been settled, with REST winning out over stateful alternatives. I worked with Seam for a time – it was an interesting idea, but so alien to the way most developers worked, that its subtleties tended to be fought with rather being made use of.
One problem that Tate raised which is still present is the approachability of Java. Even in the innocent days of 2005, the simplest useful Java application required use of a large number of tools. This issue is present in a lot of fields, including front-end dev work, where increasing sophistication has made things much more complicated. There are solutions to this, with JHipster being a promising one, but these work to hide the complexity. Just because the tools are set up for you doesn’t mean they aren’t there and can’t go wrong in strange and unpredictable ways.
EDIT: Tom Hume pointed out that the discussion above doesn’t include Android, which was originally released in 2008 and has become hugely popular, with over 2 billion users. As someone who focuses on backend dev, I didn’t engage with this, but Android has been contributed significantly to Java’s survival. Having said that, Kotlin is becoming more popular in Android, threatening Java’s dominance on that platform. Interestingly, Kotlin is failing to see significant uptake in backend dev, despite recently becoming compatible with Spring.
If I had more time, I’d also look at the JVM platform as distinct from Java. While Groovy and Clojure have faltered, Scala (launched 2004) and Kotlin (launched 2011) are both popular JVM languages